Blog
Cast vs Hand-Fabricated: Can You Tell from the Underside?
When you turn a piece of jewelry over and look at the underside, you are reading a record of how it was made. The cast process and hand-fabrication each leave different marks. Many of those marks are subtle, but with simple tools and a methodical eye you can often tell which route the maker took. Below I explain the visual and tactile signs, why they appear, and when those signs can be misleading.
What casting leaves behind (and why)
Most jewelry casting you’ll see is lost-wax (investment) casting. A wax model is invested in a refractory mold, burned out, and molten metal poured in. That workflow creates characteristic features:
- Sprue scars and vents: Look for small round or flattened scars where the sprue was cut. These are usually 0.5–2 mm across. They form because the metal enters and exits the mold through set channels.
- Mold seams and parting lines: A thin seam or line can appear where mold halves met. It may be very faint after polishing, but under magnification you can trace a line along curves or the back of a setting.
- Porosity and pinholes: Casting shrinkage or trapped gas produces tiny pits, often 0.1–1 mm. Porosity is more common in large, thick sections and in metals with poor casting setup. You’ll see it more in platinum and high-karat gold because these alloys are subject to gas entrapment and shrinkage differently than 925 silver or lower-karat gold.
- Uniform surface texture: Cast surfaces, before final polishing, often show a slightly granular or matte texture from the investment. Even after polishing, interior hollows or undercut areas may retain a different finish than filed, hand-formed metal.
Why these occur: when you pour molten metal, it flows and cools inside a mold. Where it contracts or meets mold joints you get seams, where air is trapped you get porosity, and where sprues attach you get scars.
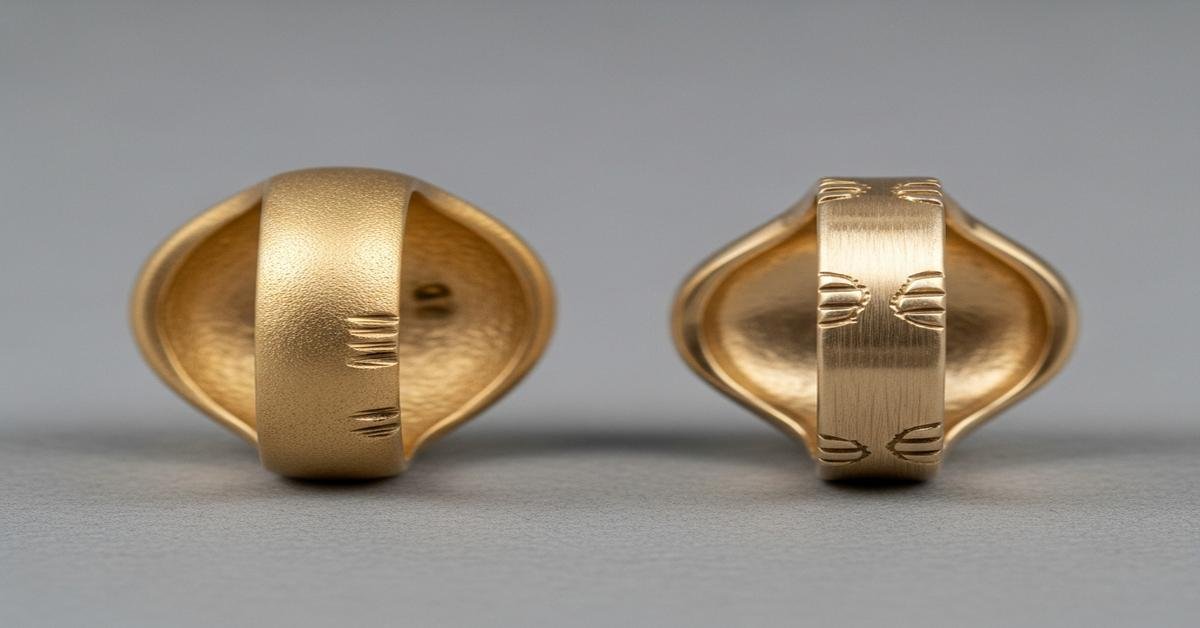
Signs of hand fabrication (and why they look that way)
Hand-fabrication means cutting, bending, soldering, filing, and hammering solid sheet or wire into shape. The underside often shows these makers’ actions:
- Solder seams and joint lines: Look for a thin raised line where two pieces were joined. Even a skilled polisher leaves a faint ridge or color shift. Solder seams are typically 0.1–0.6 mm wide and follow logical joins: shank ends, bezel bottoms, gallery joins.
- File or saw marks: Parallel lines 0.05–0.5 mm wide indicate manual filing or sawing. They’re common inside bezels, under channels, or on the back plate. These marks are deliberate—they indicate shaping after metal was joined.
- Hammer and planish marks: Small, consistent dings where the maker shaped or hardened metal. You’ll see them on hand-forged bands or textured backs. They’re evidence of mechanical forming rather than fluid fill.
- Asymmetric transitions: Handwork often results in tiny dimensional variation. Edges may soften unevenly, thickness may vary by 0.1–0.5 mm along a shank or bezel because the maker worked by eye.
Why these occur: cutting and joining are physical processes. Solder or laser welds create seams, and files or hammers leave linear or dimpled marks that are hard to erase without removing contour or metal.
Simple inspection tools and steps
You don’t need lab equipment. Use these steps with a 10x loupe, a bright light, and your fingers:
- Magnify: Use a 10x loupe or a small USB microscope at 20–40x. Look for sprue scars, seam lines, or pinholes.
- Angled light: Hold a bright lamp at a low angle to the surface. Mold seams and file marks catch the light differently than polished fields.
- Feel the surface: Run a fingertip gently across the underside. A tiny ridge (solder seam) or depressions (porosity) will be felt even if mostly polished away.
- Compare symmetry: Rotate the piece. Hand-fabricated parts often show small asymmetries; cast parts are usually more uniform where the mold cavity was uniform.
How alloy and finish change the clues
Metals and finishing techniques can hide or exaggerate signs.
- Alloy behavior: 14k gold (about 58.3% Au) is harder and polishes differently than 18k (75% Au). Platinum (Pt950) has higher melting point and different porosity traits, so cast platinum sometimes shows micro-pitting. Sterling silver (.925) is easy to file and often shows hand marks if fabricated.
- Finishing: Tumbling, vibratory polishing, and rhodium plating can mask small seams and pits. High-end makers will chase, reflow, and hand-finish to remove visible cast signs entirely.
- Laser welding: Laser welds can be narrower and less obvious than solder lines. A laser-repaired seam may show slight color change or a tiny bead under magnification.
When you can’t be sure — and why
Experts sometimes can’t tell. Skilled casters finish pieces to mimic handwork. Conversely, mass-produced hand-fabrication (machine sawing, CNC bending) can look like casting. Also, repairs change the underside: a bezel recast or a laser-welded shank will obscure origin clues.
Definitive testing exists: X-ray or micro-CT scanning reveals internal porosity and structure. Metal composition analysis and maker’s stamps also help. But for everyday identification, the visual checklist below is usually enough.
Practical checklist to decide cast vs hand-fabricated
- Visible sprue scar or mold seam → likely cast.
- Regular porosity or pinholes in thick sections → likely cast (or recast area).
- Clear solder seam, saw/ file marks, hammer marks → likely hand-fabricated.
- Highly uniform interior and shape with minimal tool marks → likely cast or very well finished.
- Rhodium plating or heavy tumble polish: take extra care — these hide clues.
- Laser welds: look for tiny, localized changes in texture or color near joins.
Bottom line: with a loupe and a methodical look you can often tell whether a piece was cast or hand-fabricated by examining the underside. But be cautious: high-quality finishing and repairs can mask the origin. When it matters — for valuation, repair strategy, or maker attribution — ask the maker or use imaging tools to confirm.