Blog
Ruby Glass-Fill: Perfect—Until It Isn’t (Microscope Photos)
Glass-filled rubies look perfect at a glance. Color fills fractures and hides pale areas. Under magnification, though, the truth shows up fast. This article explains what glass filling is, how it looks under the microscope, how labs prove it, and what that means for care and value. I’ll describe the microscope features you’ll see in photos and offer practical steps for buyers and owners.
What is glass filling and why it’s used
Glass filling is a treatment that fills fractures and cavities in ruby with a low-melting glass or flux. The glass restores transparency and boosts apparent color. The process became common for rubies from sources like Mozambique and Tanzania, where rough stones often have many surface-reaching fissures. Shops can turn an otherwise low-grade fragment into a bright, sellable gem.
Technically, the rough is heated with a glass-forming flux that melts into cracks. The glass solidifies as the piece cools. The glass is not corundum—its chemistry and mechanical properties differ. That matters for durability and identification.
What you’ll see under the microscope (and in photos)
Look through a 10–60× gem microscope with both brightfield and oblique lighting. Here are the common diagnostic features you should expect to see in microscope photos of glass-filled rubies:
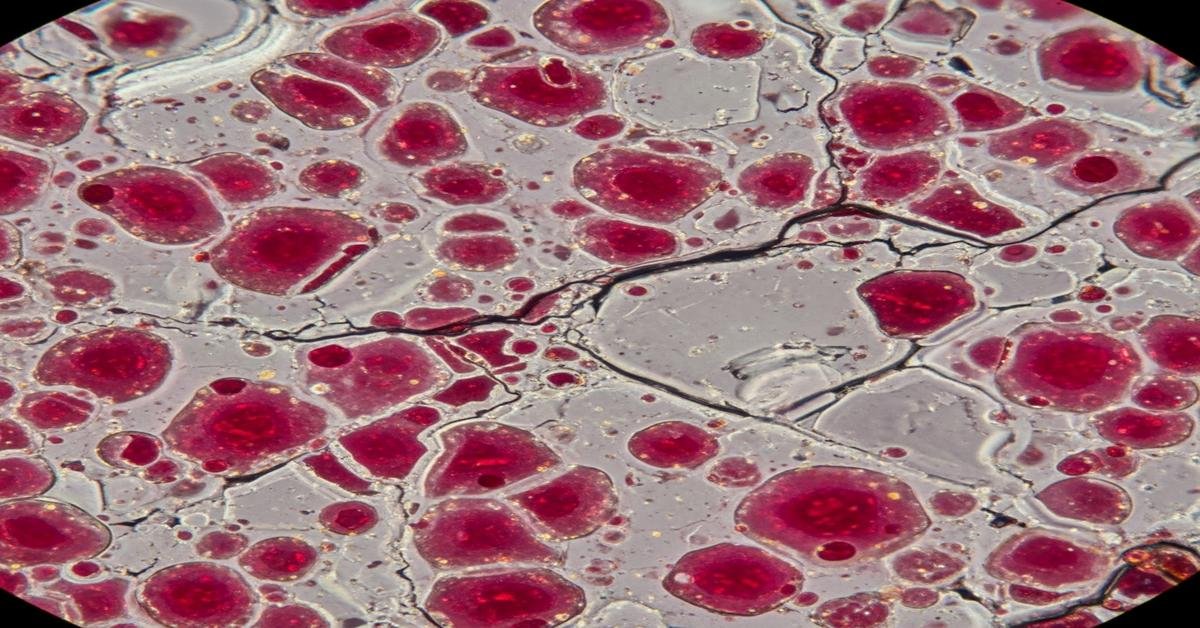
- Rounded gas bubbles: Small, often perfectly spherical bubbles trapped in the glass. Typical sizes range from about 10 µm up to a few hundred µm. They are a key sign of a melt-in process. Photos show lots of shiny round dots that sit inside fractures or cavities.
- Flow lines and streaks: Smooth, curving bands or striations inside the filler. These look like glass flow patterns and contrast with the angular, parallel needles or twinning in natural corundum.
- Sharp glass-to-stone boundaries: The interface between clear corundum and the filler often appears as a distinct boundary under magnification. You may see a thin meniscus where the glass pooled.
- Surface-reaching filling: Fractures that clearly reach the stone surface and are capped with a shiny glass layer. Photos show reflective patches or resin-like beads on the pavilion or girdle.
- Reflective “windowing” or color halos: The glass can create bright, reflective areas with a different luster than the surrounding corundum. Under angled light these areas flash differently from the host crystal.
- Color concentration zones: Sometimes the glass is colored by dissolved chromium or residues. Photos may show orange‑red patches inside fractures that differ in tone from the rest of the stone.
- Small particulate inclusions: Dark, angular inclusions can be trapped in the glass, often remnants of the original mineral matrix. They look suspended in the filler.
Microscope photos that document filled rubies typically include several views: a lower magnification overall image, and 20–60× close-ups of bubble clusters, flow lines, and surface-reaching fills. If a photo set shows only flattering, full-face shots with no close-ups of fractures, request microscope images before buying.
How gem labs and tests prove glass filling
- Microscopy is primary: A trained eye can recognize bubbles, flow lines, and contact zones. That’s usually enough for an experienced gemologist.
- Immersion cell inspection: Putting the stone in a liquid that matches the refractive index of the corundum makes fractures less obvious; the filler still reveals differences in relief and bubble behavior.
- Raman and FTIR spectroscopy: These identify glass phases and distinguish them from corundum. Raman will show glass bands not present in pure ruby.
- XRF or chemical tests: X-ray fluorescence can detect lead or other elements in the filler, confirming a lead-glass flux.
- Density and RI checks: Filled stones may give inconsistent refractive index readings or show mixed signals with specific gravity measurements, prompting further lab work.
Durability and care — why it matters
Corundum (ruby) has a Mohs hardness near 9 and is tough. Glass is much softer (typically similar to 5–6 on Mohs) and brittle. That mismatch creates practical vulnerabilities:
- Not shock-resistant: A knock can fracture the glass or dislodge it from a surface-reaching fissure.
- Avoid heat and steam: Strong heat can re-melt or expand the glass. Steam-cleaning and high-temperature repairs risk damaging the filler.
- No ultrasonic cleaning: Ultrasonic cleaners can loosen or remove filler and create new surface damage.
- Gentle cleaning only: Use warm soapy water and a soft brush. Dry carefully. Don’t use acids, strong solvents, or heated steam.
Value, disclosure, and what buyers should ask
Glass-filled rubies can look stunning but are not equivalent in value to untreated or heat‑only rubies. Proper disclosure is essential. A filled ruby should be priced substantially lower than a comparable untreated stone because the treatment affects durability and future resale.
When evaluating a purchase, ask for:
- High-magnification photos showing fractures and filler from multiple angles.
- Written disclosure of the treatment (terms like “lead-glass filled,” “fracture-filled,” or “composite” are common).
- Any lab report or certificate. Reputable labs will state “glass-filled” on the report.
As a rule of thumb, expect a filled ruby to be a small fraction of the price of a similar-looking untreated stone. If a seller avoids direct answers or lacks photos, walk away.
Repair and long-term options
If you already own a filled ruby, options are limited but possible:
- Re-polishing or recutting: Can remove surface-reaching filler and improve durability, but will reduce weight (ct) and dimensions (mm).
- Re-filling: Some workshops can reapply filler, but that’s a temporary cosmetic fix and not always recommended.
- Replace with untreated stone: For heirloom jewelry or engagement rings, consider replacing a filled ruby with an untreated or heat-only stone to ensure long-term wear.
Glass-filled rubies are a useful category: they let people buy big, colorful rubies on a budget. But they require honest disclosure, careful handling, and realistic price expectations. Under the microscope, the giveaway signs are clear: bubbles, flow lines, and sharp glass boundaries. If you rely on photos, insist on close-up microscope images showing those features before you buy.